

4 Ways to Prevent Truck Wheel-Offs
Keeping truck wheels where they belong should simply be a matter of process and procedure.

Bearing failures are less common than fastener-related separations, 26% compared to 65%, say several investigative reports on wheel separations.
Photo: Jim Park
The causes of wheel separation are well known. They include bearing failures; loose, broken, or missing wheel fasteners; damaged wheels, and to a lesser degree, failures of certain axle and suspension components.
What’s not as well understood is why these events continue to occur.
The Canadian province of Ontario has done loads of research into wheel separations and is probably the most active jurisdiction in North America when it comes to wheel-separation investigation. More than 2,300 wheel separations were reported there between 1997 and 2019, and 11 people lost their lives to separated truck wheels during that period, according to the province’s Ministry of Transportation.
Investigations conducted by the province determined that 26% of separations resulted from bearing or wheel-end failures, while about 65% were wheel-fastener related. In 83% of the reported incidents, repairs or maintenance had been performed on the suspect wheel(s) a short time prior to the separation. In one case, a vehicle traveled just 355 miles before a separation occurred following the installation of new brake linings at the suspect wheel position.
Despite the abundance of training material and step-by-step instructions provided by wheel component suppliers, industry associations and others, wheels continue coming off trucks. Keeping wheels where they belong should simply be a matter of process and procedure. Here are four reminders of what needs to be done when servicing truck tires and wheels to ensure they don’t wind up in a forest or a field – or the front seat of an oncoming car.
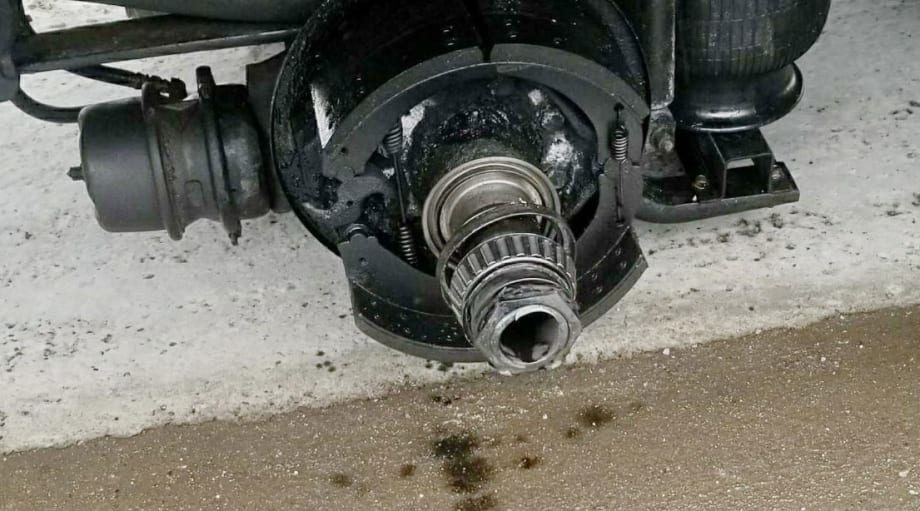
1. Be Finicky About Wheel Bearings
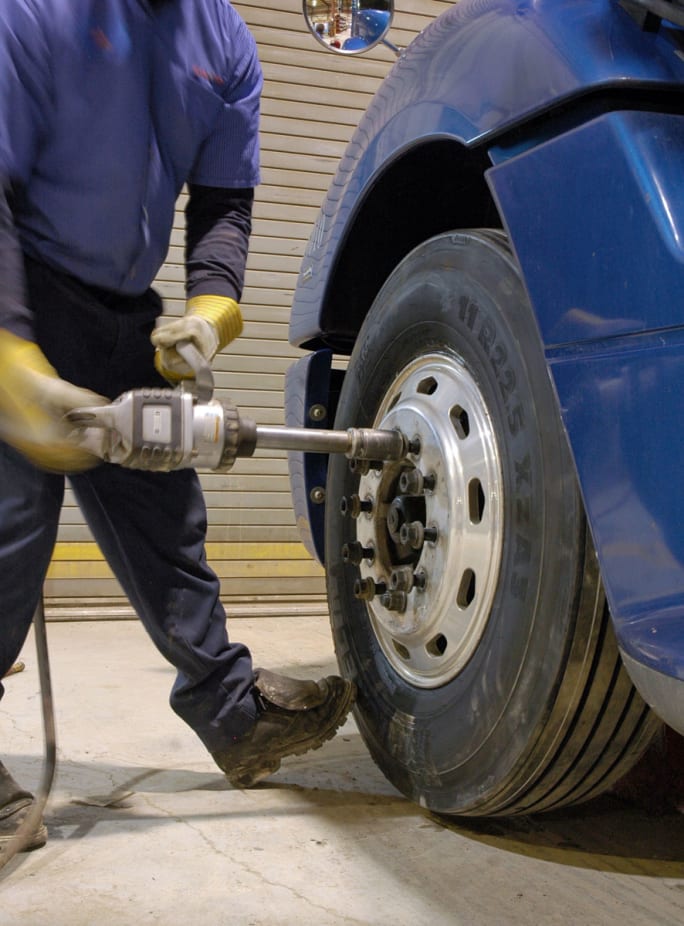
Only calibrated electric or pneumatic torque wrenches should be used to tighten wheel fasteners. Regular pneumatic wrenches are okay for running the nut onto the stud, but that's all.
Photo: Jim Park
Bearing-related wheel-end failures are often caused by over- or under-tightened bearings or lack of lubrication. Under-tightening (excessive endplay) can cause the wheel to wobble on the spindle, damaging the seal, which can lead to a loss of lubricant. Over-tightening (excessive preload) can damage the bearing, causing overheating, seal failure, and lubricant loss.
While slight preload of the bearings is regarded as the optimum environment, determining it is almost impossible without special tools, such as Temper Axle’s Doctor Preload bearing adjustment tool, distributed by Meritor.
To combat inconsistency in adjustment, component suppliers publish installation instructions (not installation guidelines). There also are generic instructions such as Recommend Practice 618B from the American Trucking Associations’ Technology & Maintenance Council. This RP describes a nine-step installation and adjustment process, depending on the type of wheel-end assembly, finishing up with the use of a dial indicator to verify correct adjustment.
But industry sources say that because it’s finicky and time-consuming, the final step is often left out – despite being one of the most critical parts of the process.
“That’s a recommendation for an ideal situation,” admits John Heffernan, SKF key account manager. “Getting techs to use torque wenches was a huge step for the industry. Use of dial indicators is growing, and more fleets are adopting the practice, but we still have a long way to go.”
Jeremy Gough, director of national fleet maintenance at Bison Transport, one of the consistently safest fleets in North America, has a second technician check the work before the truck or trailer is released from the shop. “A second set of eyes goes a long way to ensuring the job is done right the first time,” he says. “It takes a bit longer, but it’s less time-consuming than dealing with a failure.”
One option is switching from conventional to pre-adjusted hubs, sometimes generically called “pre-set” hubs – although, much like people call any clear tape “Scotch tape” or any facial tissue “Kleenex,” that’s actually a brand name associated with ConMet (Consolidated Metco).
“This technology takes bearing adjustment out of the hands of the commercial vehicle manufacturer and guarantees that equipment leaves the factory with wheel bearings optimally adjusted for miles of service with a minimum amount of required maintenance,” says Roger Maye, ConMet’s national service manager.
With pre-adjusted hub assemblies, a precision-machined hub combined with tight tolerance bearings and spacer provide a fixed dimensional distance between the inner and outer bearing. Simply spinning on the axle fastener and torqueing exactly to the manufacturer’s specification sets the bearings properly every time, without the need to verify end play with a dial indicator, says Drew Coen, Stemco’s wheel-end product manager.
“Pre-adjusted hubs are easier to install and eliminate the need for fleets and repair facilities to have multiple parts to build a complete wheel-end,” Coen adds. “The pre-assembly of the components and ease of install saves the mechanics time and eliminates wheel end installation mistakes that could lead to costly and/or unsafe conditions as the vehicle is put back into service.”
Bill Hicks, SAF-Holland’s director of product planning, says fleets are slowly shifting to pre-adjusted hubs for the labor savings and the relative ease of installation.
“We’ve seen slow but steady growth in orders for pre-adjusted hubs on our axles,” he says. “They cost more because of the more precise machining and the tighter tolerances involved, but it becomes a value equation for the fleet. They are easier and less time-consuming to install, and they usually come with longer warranties. As well, when the technicians follow the installation instructions, the bearing is pre-tightened properly every time. It takes away some of the technician’s ‘discretion’ in how the hub and bearings are installed.”
Hicks cautioned that technicians may still need some training to help them identify a pre-adjusted hub. There’s risk of damage to the bearings and the bearing spacer if excessive torque is applied to the retaining nut during installation.
2. Check Wheel-Ends During PM Inspections
Bearing condition can be checked during regular preventive maintenance inspections by jacking up and safely supporting the wheel and rotating it while listening for noise. Maye suggests placing a hand on the steering knuckle or brake chamber to check for vibration when the wheel is rotating. Next, check for movement or “chucking” by placing a pry bar under the tire and, with one hand on top of the tire, lift the wheel-end and feel for movement between the hub and the spindle.
“Make sure to grease the kingpin on steer axles before this test, as kingpin wear can feel like wheel-end chucking,” he says. “If excessive movement is found, wheel-end service is required.”
Trailer hubs lubricated with semi-fluid grease should be inspected annually by removing the hubcap to check the presence and condition of the lubricant. Add additional lubricant if the ends of the bearing rollers are not covered. If the lubricant appears dried out, the wheel-end should be removed, cleaned, reinstalled, and new lubricant added to the proper level. Maye suggests either using the fill-plug magnet on PreSet hubs or placing a handheld magnet into the lubricant well to check for metallic particles. “If metal bits are found, the hub should be disassembled to find and correct the source of the issue.”
3. Properly Prepare Wheel and Hub
Before you even think about putting the wheel back on the truck, be certain the contact surfaces between the hub and the inner and outer wheels are absolutely free of dirt, rust, grease and other contaminants.

Fastener retainers can prevent nuts from backing completely off, but they won’t indicate a possible loss in clamping force if excess material between the wheel and the mounting face comes loose. Periodic torque checks are still required.
Photo: Jim Park
“A buildup of foreign material on the wheel-end mounting surfaces causes extra thickness in the joint,” explains Brandon Uzarek, Accuride’s field engineer for wheels. “The foreign material may settle or work its way out of the joint, causing the tension in the bolt to decrease, resulting in a loss of clamping force.”
The contact areas must be rigorously cleaned with a wire brush to remove all foreign material before mounting the wheel. Wheel studs should be cleaned with a wire brush as well to rid the thread grooves of rust and foreign material that can affect the torque on the nut.
Extra care is needed with painted steel wheels. Rust can develop under the paint if the finish is broken, causing flaking. This material can drop out over time, reducing the clamping force. The coating thickness on a painted wheel is important, too, as coatings thicker than 3–3.5 mils can affect the mounting surfaces between the bolt holes.
4. Don't Overlook the Fasteners
While there’s little published research on the impact of hardware aging and degradation caused by use and environmental factors, research by Ottawa, Ontario-based Woodrooffe and Associates, published in the paper “Heavy Vehicle Wheel Separations: Exploring the Causes,” suggests that re-using degraded flange nuts could cause problems.
“Anecdotal tests have shown that as [two-piece] flange nuts age, or when they are re-used, their torque/clamping force characteristics can be as little as 50% of the design value,” the report notes. “Given that hub-piloted wheels depend exclusively on clamping force to prevent the wheel from separating from the hub, such a reduction in clamp force characteristics represents a significant risk to wheel separation.”
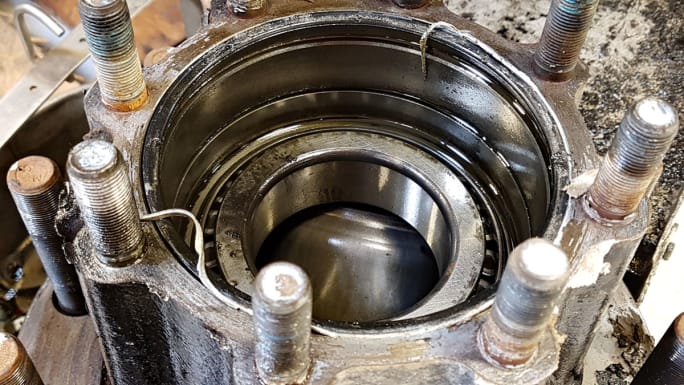
Check the condition of the inner surfaces and the bearing races before reinstalling the hub to prevent further bearing damage.
Photo: Jim Park
Tighter is not better, especially when re-using studs and nuts. Many technicians attempt to achieve maximum clamping force by applying more than 500 lb-ft of torque without realizing the possible consequences.
“If a wheel stud is subjected to excessive torque, it is possible to stretch the stud past its yield point,” cautions Accuride’s Uzarek. “If this occurs, the joint will act as if it is under-torqued – and there will be lower, not higher, clamping force.”
Stretched studs will have deformed threads. Check the condition by hand-threading a new nut and observing any unusual resistance to hand-turning. That could indicate stretching. When fastening the nuts to their final torque, use only a calibrated torqueing device.
With all that said, there remains one step in this process that fleets rarely, if ever, comply with: the wheel-fastener retorque. The manufacturers of heavy truck wheels recommend that wheels be checked for correct torque between 50 and 100 miles after wheel installation. Doing that is extremely difficult in a logistics sense for most fleets, but there are alternatives.
Some suggest running the truck around the yard with a loaded trailer, doing a series of tight right and left turns and hard brakes, to give the wheels an opportunity to settle onto the studs and against the mounting face of the hub, and then retorquing them. Others recommend flagging the unit for a retorque the next time it arrives in the yard.
Neither situation is ideal, but both are better than completely ignoring the requirement to retorque the wheels after installation.
More Maintenance
Mack Expands Premium Service Contract Coverage to Medium-Duty MD
With a service contract, inspections, preventive maintenance and repairs can be handled in a single visit instead of multiple ones.
Read More →
Maintenance in the Messy Middle Part 5: Battery-Electric Trucks
No oil changes. No diesel exhaust fluid. No exhaust aftertreatment. But NACFE battery-electric trucks still require specialized maintenance procedures.
Read More →
Trucking Fleets Faced Record Operating Costs During Third Year of Freight Recession
ATRI's annual operational cost report shows carriers trimmed fleets, delayed equipment purchases, and ran older trucks as expenses continued to outpace freight rates.
Read More →
Noregon Launches CAN Mentor to Simplify Vehicle Network Diagnostics
New Noregon software helps technicians identify CAN network issues without requiring advanced diagnostic equipment or specialized training.
Read More →
Maintenance in the Messy Middle Part 4: Renewable Natural Gas
The keys to running renewable natural gas as a fleet fuel depend on specialized technician training, rigorous inspection schedules and an understanding of high-pressure fuel systems.
Read More →
Mack Adds 'Lock & Leave' Feature to Simplify Over-the-Air Software Updates
Mack’s new OTA enhancement allows drivers to start eligible software updates, lock the truck and walk away.
Read More →
Maintenance in the Messy Middle Part 3: Biodiesel
Biodiesel can reduce emissions, improve fuel-system lubricity and use existing diesel infrastructure. But NACFE’s Messy Middle maintenance report says fleets must actively manage storage, cold-weather operation, filters and oil drain intervals to avoid problems.
Read More →
Rush Expands Gulf Coast Peterbilt Network With Louisiana Acquisition
The expanded Rush network gives fleets additional sales, service, leasing and collision repair support across Louisiana's major trucking markets.
Read More →
Is Your Parts Procurement Process Reactive or Proactive?
Ready to revamp your parts procurement process? Learn how now with “Strategic Parts Purchasing: A Process Checklist”
Read More →
Maintenance in the ‘Messy Middle’ Part 2: Renewable Diesel Fuel
NACFE's latest Messy Middle Powertrain Service & Maintenance report says renewable diesel gives fleets an opportunity to reduce carbon emissions without changing trucks, fueling infrastructure or maintenance practices. But technicians still need to understand several important operational differences.
Read More →